Years ago when I was engineering Izzy’s Arcade Bar, we had bought a Mario Bros. (widebody) and had it shipped from somewhere in Virginia to Chicago. I was greeted to the monitor not displaying green. Instinctively I immediately set to working on the color drive transistors at the neckboard, but alas there was still no green. It was then I remembered something I’d encountered a few years prior on my PlayChoice-10 (dual monitor): this was not a Sanyo EZV, but rather a Z2AW.
The Z2AW is notable for including a color inversion board, I don’t know if that was forward thinking on Nintendo/Sanyo’s part for future conversions since authentic Nintendo games have their color outputs inverted or not. This being a Mario Bros. however, the inversion board was not necessary at all. It’s to my understanding that Punch-Out and Super Punch-Out also came with these.
Back to Mario Bros. though, the reason the green was missing was because the header pin solder on the inverter board had cracked. I’m fairly certain I exercised my right to use my then-new Hakko FR300 to correct the issue at the inverter, but I wound up circumventing it entirely because I view it as an additional point of failure. I made a post recently on KLOV to help someone with this type of issue and I was so thorough about it I figured it would be put to better use here. Read on below, it dives into the theory and operation of the color outputs. Everything outside the inversion board also applies to the Sanyo EZV, and there’s a bit about the Vs. Uni/Dualsystem boards too.
———–
As far as colors, there are different areas to check. If you have a Z2AW monitor rather than the usual EZV, it will have a separate inverter/color board that should be done away with (NOTE: This method is only applicable with authentic Nintendo games). It takes the video signal in off the game harness and then has another cable that plugs into the monitor deflection board.

In this Mario Bros. widebody the rainbow colored harness is the signal from the game board, the cream colored ribbon cable is the pass through from the inversion board to the monitor deflection board.

Close up of the pass through ribbon cable connection to the deflection board.
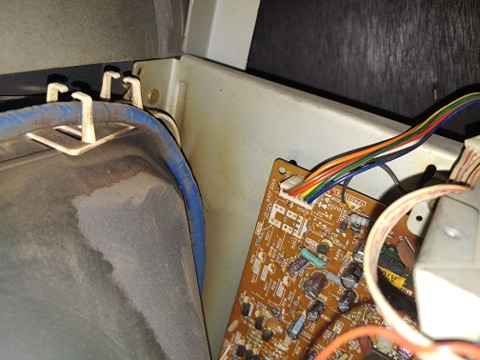
On authentic Nintendo games you can run the rainbow colored harness signal straight into the monitor deflection board. (These may be cream colored on the older games like Donkey Kong or Popeye.)
The inverter boards I’ve found can develop cracks in the solder and you’ll lose colors this way. If you look closer at the inversion board there are 3 adjustments, each for red, green, and blue. Trying to balance this with the adjustments at the monitor neckboard can be a pain, so that’s another reason to do away with the inversion. The Vs. main boards also have their own color output adjustments, I don’t think these are necessarily points of failure (I don’t see solder being an issue) but if someone previously dialed one of the colors all the way down at the game board, it will appear missing at the monitor or in the very least barely visible. In other words if you’re running a Vs. game with a Z2AW, you will have 3 separate color adjustments.
Here are some helpful tips for the monitor itself. I strongly encourage replacing the caps on these Sanyo monitors because the ones they came with if they’re original were poor and will leak and cause a lot of problems. One of the most common failure symptoms will be vertical foldover at the top or in extreme cases outright vertical collapse due to a failed/leaking C407. The filter capacitors seem to be going bad on them now too (that’s the difference of 40 years of age vs. 30-ish years of age when I owned my Nintendo games). If you observe a wavy picture or testing B+ reveals the voltage to be way below the 108V it should be set at, suspect the filter capacitor being bad. I haven’t seen it since, but when I capped the monitors on my DK, Popeye, and Vs.-turned-Mario Bros. I needed to resolder the color drive transistors on the neckboards too, as replacing the caps made the colors drop out somehow.
Upon replacing the caps, go ahead and white balance the monitor next, just have a black background in the game and dial the red green and blue up until the picture tints accordingly, then back off until the tint goes away. Do the same for the brightness, in fact, probably do this first, dial brightness up to where you see the pixel dots in the black raster, then turn it down until it’s absolute black.
The Sanyo tubes are generally very high quality, but I’m starting to see them with weak guns now too, like I said, 40 years of age, so you could potentially have a totally weak gun. I’ve had success restoring the guns with my BK 467, like I said, pretty high quality tubes.
Now you know all the various points of failure with the colors and how to adjust them properly.
Photo credits to Jason Hedlund at Yetee Station.